多層パーセプトロンをPythonで実装してみた-手書き数字認識-
前回(↓)の続き。
簡単な分類で動作を確認できたので次は数字認識をやってみる。
多層パーセプトロンをPythonで実装してみた-1- - 日曜技術者のメモ
で書いたクラスは出力層が二個以上に対応していなかったので修正して使った。
ブログは修正済み。
数字の分類では出力層にソフトマックス関数を使って出力を
[-1,1]ではなく確立にするのが普通の様だが今回は出力層をそのままにして
学習データは正しい数字は0.5、その他の数字は0として学習した。
sklearn.datasets
sklearn.datasetsに手書き文字があったのでまずはそれでやってみる。
The Digit Dataset — scikit-learn 0.18 documentation
8x8の数字なのでかなり荒い。
入力層は8pix×8pix=64個
出力層は0から9の10個
学習率0.03
600文字学習を繰り返す。
実装コード
def digit_sepalate():
  #テストデータ作成
  iteration_num = 100000
  sample_num = 600

  digits = load_digits()

  x = digits.data
  y = digits.target
  x_max = x.max()

  x /= x.max()
  x *= 0.5

  iLayer = nn.inputLayer(64,10,10)
  oLayer = nn.outputLayer(64,10,1,0.05)

  inputLayerY = np.zeros(64)
  dut_output = np.zeros(10)

  x1_array = np.arange(0,8,1)
  x2_array = np.arange(0,8,1)
  pos_x1,pos_x2 = np.meshgrid(x1_array,x2_array)
  val_y = np.identity(40)


  plt.ion()

  match_list = []
  cnt_list = []

  shuffle_list = list(range(sample_num))

  plt.pause(0.05)

  for i in range(iteration_num):
    match = 0
    for j in range(sample_num):
      inputLayerY = x[j]

      iLayer.foward(inputLayerY)
      oLayer.foward(iLayer.getY())

      exp_y = np.zeros(10) - 1


      dut_output = oLayer.getY()

      exp_y[y[j]] = 1.0

      oLayer.backprop(exp_y)

      oLayer.updateWeight()

      if(dut_output.argmax() == digits.target[j]):
         match += 1

    #次の学習時に順番をシャッフルする
    random.shuffle(shuffle_list)

    if (1):
      plt.clf()
      match_list.append(match/sample_num)
      cnt_list.append(i)

      for i in range(10):
        plt.subplot(3,5,6+i)
        plt.xlim(0,7)
        plt.ylim(0,7)
        plt.pcolor(pos_x1,pos_x2,oLayer._weight[i].reshape(8,8))

      plt.subplot(3,1,1)
      plt.plot(cnt_list,match_list)
      plt.pause(0.05)


  while True:
    plt.pause(0.05)
↓は実行結果

10個のヒートマップは各出力層の重み値を出力している。
うまくいけば数字に見えるが・・・微妙。
数回の学習でかなりの精度になった。
MNIST
次は有名なMNISTでやってみる。
データは以下にあるがsklearnで関数が容易されているのでそっちを使った。
MNIST handwritten digit database, Yann LeCun, Corinna Cortes and Chris Burges
入力層は28pix×28pix=784個
出力層は0から9の10個
学習率0.03
1000文字学習を繰り返す。
↓は実行結果
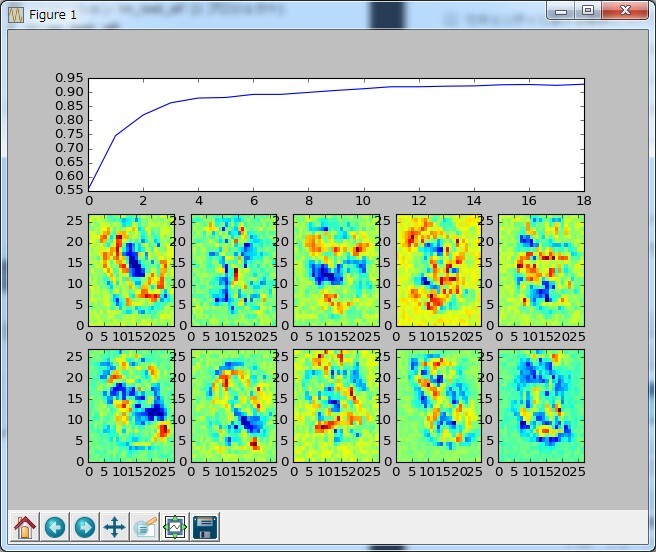
10回の学習で正解率91%!!
幾ら何でも学習速すぎないかと思っていたが
これは学習した数字で学習率を見てるので速いのは当たり前だった
次は学習する数字と正解率を評価する数字を別々にしてみる。
正解率は100文字中の正解数
1000文字学習

5000文字学習

10000文字学習

50000文字学習
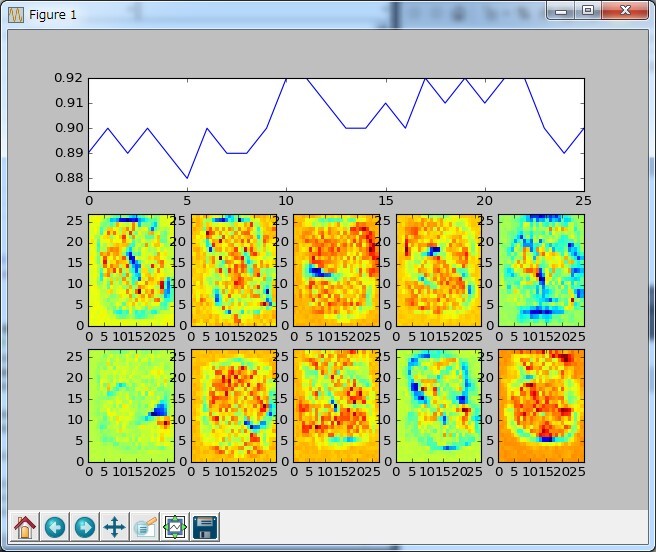
さっきよりは学習に時間がかかっているが問題なく分類できてる
重みのヒートマップも0,3,8はそれっぽい。
多層パーセプトロンをPythonで実装してみた-2-
前回(↓)の続き。
多層パーセプトロン各層の実装ができたので実際に動かしてみる。
パーセプトロンの数や層の構成は↓を参考にした。
googlecloudplatform-japan.blogspot.jp
簡単な分類
直線分類
まず↓をやってみる。
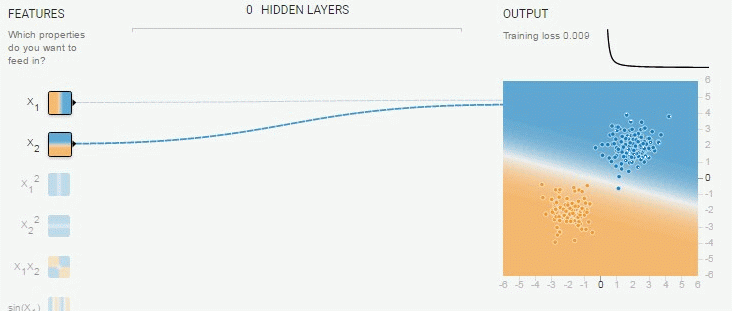
実装は↓
# -*- coding: utf-8 -*-

import numpy as np
import matplotlib.pyplot as plt
import random as random
from sklearn.datasets import make_blobs
from sklearn.datasets import make_circles

import NNLayer as nn

def linearlySeparable():

  #学習数、ループ回数
  iteration_num = 10
  sample_num = 100

  #学習結果表示グラフ設定
  x1_array = np.arange(-8,8,0.4)
  x2_array = np.arange(8,-8,-0.4)
  pos_x1,pos_x2 = np.meshgrid(x1_array,x2_array)
  val_y = np.identity(40)

  shuffle_list = list(range(sample_num))
  match_list = []
  cnt_list = []
  inputLayerY = np.zeros(2)

  #NN作成
  iLayer = nn.inputLayer(2,2,1)
  oLayer = nn.outputLayer(2,1,1,0.03)

  #テストデータ作成
  centers = [(3,3),(-3,-3)]
  #centers = [(-3,-3),(3,3)]
  #centers = [(0,-3),(0,3)]
  #centers = [(-3,0),(3,0)]
  x_exp,y_exp = make_blobs(n_samples= sample_num,centers=centers,random_state=42,cluster_std=1.5)

  #yの値を[0,1]から[-1,1]にする
  y_exp = [x if x != 0 else -1 for x in y_exp]

  #初期値で一度グラフ描画
  plt.ion()

  for index_x1 in range(len(x1_array)):
    for index_x2 in range(len(x2_array)):

      #X1
      inputLayerY[0] = x1_array[index_x1]
      #X2
      inputLayerY[1] = x2_array[index_x2]

      iLayer.foward(inputLayerY)
      oLayer.foward(iLayer.getY())

      val_y[index_x1][index_x2] = oLayer.getY()
  #グラフ表示
  plt.clf()
  plt.subplot(2,1,1)
  plt.xlim(-8,8)
  plt.ylim(-8,8)
  plt.pcolor(pos_x1,pos_x2,val_y)
  plt.colorbar()
  plt.scatter(x_exp[:,0],x_exp[:,1],c=y_exp,s=80)
  plt.subplot(2,1,2)
  plt.plot(cnt_list,match_list)
  plt.pause(0.05)


  for i in range(iteration_num):
    match = 0
    #学習フェーズ
    for j in shuffle_list:

      #X1
      inputLayerY[0] = x_exp[j][0]
      #X2
      inputLayerY[1] = x_exp[j][1]

      iLayer.foward(inputLayerY)
      oLayer.foward(iLayer.getY())

      if (((y_exp[j] < 0) & (oLayer.getY() < 0)) |
          ((y_exp[j] > 0) & (oLayer.getY() > 0))):
        match += 1

      oLayer.backprop(y_exp[j])
      oLayer.updateWeight()

    #次の学習時に順番をシャッフルする
    random.shuffle(shuffle_list)

    match_list.append(match/sample_num)
    cnt_list.append(i)
    #学習結果(ヒートマップ)
    for index_x1 in range(len(x1_array)):
      for index_x2 in range(len(x2_array)):

        #X1
        inputLayerY[0] = x1_array[index_x1]
        #X2
        inputLayerY[1] = x2_array[index_x2]

        iLayer.foward(inputLayerY)
        oLayer.foward(iLayer.getY())

        val_y[index_x2][index_x1] = oLayer.getY()

    #結果グラフ表示
    plt.clf()
    plt.subplot(2,1,1)
    plt.xlim(-8,8)
    plt.ylim(-8,8)
    plt.pcolor(pos_x1,pos_x2,val_y)
    plt.colorbar()
    plt.scatter(x_exp[:,0],x_exp[:,1],c=y_exp,s=80)
    plt.subplot(2,1,2)
    plt.plot(cnt_list,match_list)
    plt.pause(0.05)

  while True:
    plt.pause(0.05)

if __name__ == '__main__':
  linearlySeparable()
オンライン学習、学習率は0.03固定で実行
実行結果は↓
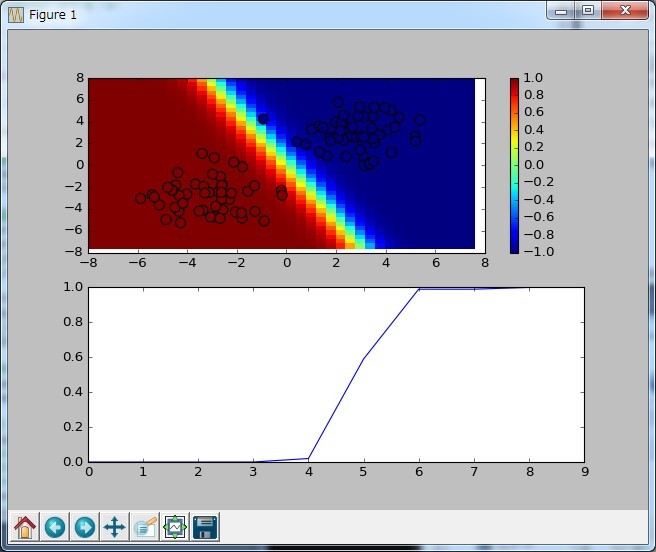
悪いときでも100データ×10回学習すればほぼ100パーセントになった。
円形分類
次は隠れ層を追加する。
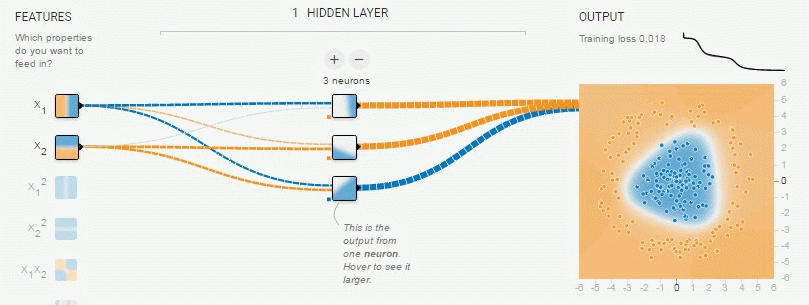
実装は直線分類とほぼ同じ。
異なるのはパーセプトロンの構成とループ数とテストデータ作成
テストデータ
  #テストデータ作成
  x_exp,y_exp = make_circles(n_samples = sample_num,factor=0.3,noise=0.05)

  x_exp *= 3

  #yの値を[0,1]から[-1,1]にする
  y_exp = [x if x != 0 else -1 for x in y_exp]
3倍しているのはそのままだと円が小さかったので適当に大きくしている。
パーセプトロン構成
  #NN作成
  iLayer  = nn.inputLayer(2,4,4)
  h0Layer = nn.hiddenLayer(2,4,1,0.03,True)
  oLayer  = nn.outputLayer(4,1,1,0.03)
結果は↓
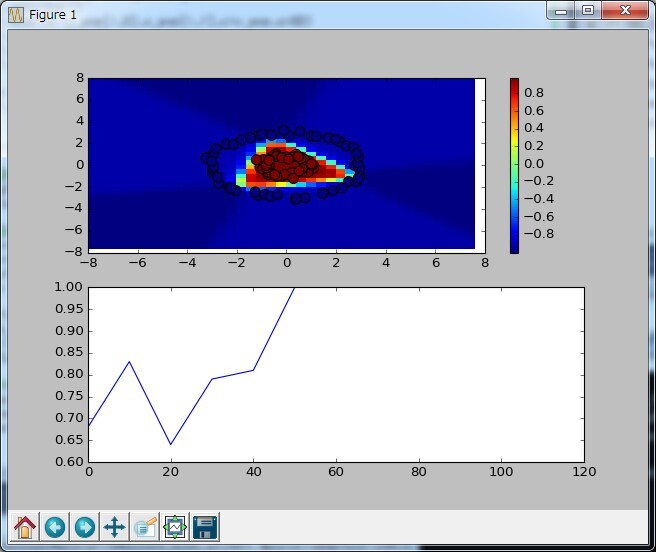
100データ×50回学習すればほぼ100パーセントになった。
ただ、初期値がランダムの為か、たまに↓みたいに収束しない時がある。

渦巻き分類
もっと隠れ層を追加する。
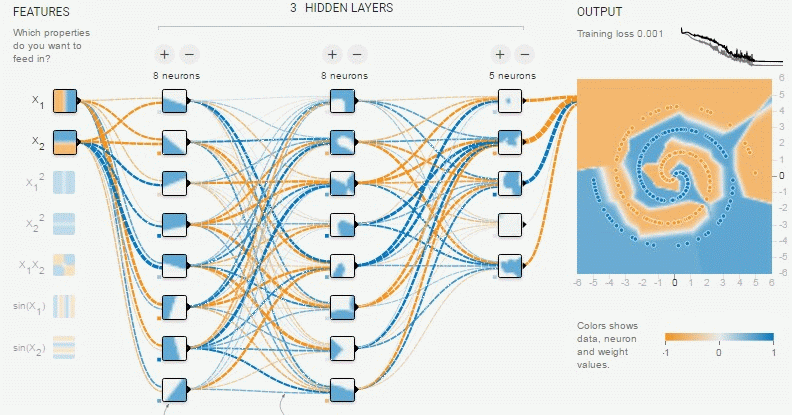
sklearnに渦巻きのデータセットがなさそうだったので数式を実装した。
テストデータ
  x_exp = np.zeros((sample_num,2))
  y_exp = np.zeros(sample_num)
  for i in range (sample_num):
    theta = random.uniform(-3*math.pi,3*math.pi)
    if (theta > 0):
      x_exp[i][0] = 0.5*math.cos(theta)*theta
      x_exp[i][1] = 0.5*math.sin(theta)*theta
      y_exp[i] = 0.5
    else:
      x_exp[i][0] = 0.5*math.cos(theta)*theta
      x_exp[i][1] = 0.5*math.sin(theta)*-theta
      y_exp[i] = -0.5
テストデータは[-1,1]ではなく[-0.5,0.5]にしている。
これは[-1,1]でなかなか収束しない時に↓を見たら、
tanhの時は出力を-0.65848~0.6584にすると良いと
書いてあったのでそうすると収束率がかなり改善した。
パーセプトロン構成
  #NN作成
  iLayer  = nn.inputLayer(2,8,8)
  h0Layer = nn.hiddenLayer(2,8,8,0.03,True)
  h1Layer = nn.hiddenLayer(8,8,5,0.03,True)
  h2Layer = nn.hiddenLayer(8,5,1,0.03,True)
  oLayer  = nn.outputLayer(5,1,1,0.03)
結果は↓

データ数が100だと渦巻きがかなりまばらになったので
これはデータ数を200にしている。
200データ×300回くらいでほぼ100パーセントになる。
長くなったので今回はここまで
次回こそはMINSTやるよ!
多層パーセプトロンをPythonで実装してみた-1-
A Neural Network Playgroundのデモが素晴らしかったので
Pythonを使ってそれっぽく動く物を作ってみた。
開発環境
- Visual studio 2015 community
- PTVS
- Python3.5.2
- numpy 1.11.1
- scipy 0.18.0
- scikit-learn 0.18
- matplotlib 1.5.3
多層パーセプトロン
ニューラルネットワークはまったくの初心者だったので色々調べると
多層パーセプトロンを使えばできそうなのでそれについて調べた。
順方向の計算は簡単
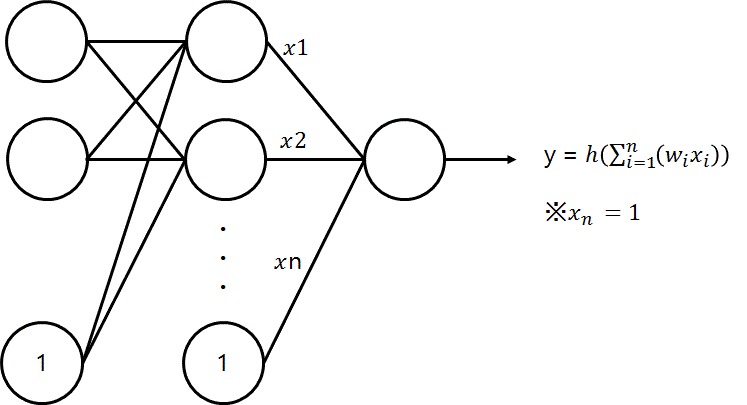
逆誤差伝播法はかなり難しい・・・
出力層はなんとか自分で計算できたが隠れ層は無理。
↓も正解か自信がない(手書き文字認識は問題なく出来たから大丈夫だとは思う)
+出力層

+隠れ層

学習は1データ(x,yの値と期待値y)毎に更新するオンライン学習
重み更新は学習率固定
ニューロンレイヤークラス
まず基本となるレイヤークラスを作成して
それを継承して出力層クラスと隠れ層クラスを作成した。
playgroundのデモは値の範囲が-1~+1までなので活性化関数はtanh(x)を使った。
※11/1複数の出力層に対応する様修正
# -*- coding: utf-8 -*-

import numpy as np

class neuronLayer(object):
  """レイヤー基本クラス"""
  def __init__(self,input_num,neuron_num,output_num,e,bias=None):
    self._input_num = input_num
    self._neuron_num = neuron_num
    self._ouput_num = output_num
    self._e = e

    if bias is None:
      self._isBias = False
    else:
      self._isBias = True
      #biasを追加する拡張
      self._input_num += 1
      self._bias = np.ones([self._neuron_num,1]).reshape(self._neuron_num,1)

    #初期化
    self._x = np.zeros(self._input_num*self._neuron_num).reshape(self._neuron_num,self._input_num)
    self._s = np.zeros(self._neuron_num)
    self._y = np.zeros(self._ouput_num*self._neuron_num).reshape(self._neuron_num,self._ouput_num)
    self._delWdelE = np.zeros(self._input_num*self._neuron_num).reshape(self._neuron_num,self._input_num)
    self._delSdelE = np.zeros(self._ouput_num*self._neuron_num).reshape(self._neuron_num,self._ouput_num)

    #重みランダム初期化
    #self._weight = np.random.rand(self._neuron_num,self._input_num)*2-1.0
    #http://deeplearning.net/tutorial/mlp.html
    self._weight = np.asarray(
                np.random.uniform(
                    low=-np.sqrt(6. / (self._input_num + self._ouput_num)),
                    high=np.sqrt(6. / (self._input_num + self._ouput_num)),
                    size=(self._neuron_num, self._input_num)
                )
            )

  def activationFunction(self,x):
    return self.tanh(x)

  def dActivationFunction(self,x):
    return self.dtanh(x)

  def sigmoid(self,x):
    return(1.0/(1.0+np.exp(-x)))

  def dsigmoid(self,x):
    return self.sigmoid(x)*(1-self.sigmoid(x))

  def tanh(self,x):
    return np.tanh(x)

  def dtanh(self,x):
    return 1.0-self.tanh(x)*self.tanh(x)

  def ReLu(self,x):
    return x * (x > 0)

  def dReLu(self,x):
    return 1.0 * (x > 0)

  def foward(self,x):
    #biasが有効のときはbiasを追加
    if(self._isBias == True):
      self._x = np.hstack((x,self._bias))
    else:
      self._x = x

    # s = Σ(x*w)
    if(self._neuron_num == 1):
      self._s = (self._x * self._weight).sum()
    else:
      self._s = (self._x * self._weight).sum(axis=1)+np.zeros(self._ouput_num).reshape(self._ouput_num,1)
    self._y = self.activationFunction(self._s)

  def updateWeight(self):
    #print(self._weight)
    self._weight -= self._e * self._delWdelE

  def getY(self):
    return self._y

  def getWeight(self):
    if(self._isBias == True):
      #前段はbiasの重みが不要なので削除して返す
      return np.delete(self._weight,self._input_num-1,1)
    else:
      return self._weight

  def getDelSdelE(self):
    return self._delSdelE


class inputLayer(object):
  def __init__(self,input_num,neuron_num,output_num):
    self._input_num = input_num
    self._neuron_num = neuron_num
    self._ouput_num = output_num

    self._x = np.zeros(self._ouput_num).reshape(self._ouput_num,1)
    self._y = np.zeros(self._input_num*self._ouput_num).reshape(self._input_num,self._ouput_num)

  def foward(self,x):
      self._y = x + self._x

  def getY(self):
    return self._y


class outputLayer(neuronLayer):
  def backprop(self,y):
    if(self._neuron_num==1):
      self._delSdelE = (self._y -y) * self.dActivationFunction(self._s)
    else:
      self._delSdelE = (self._y -y) * self.dActivationFunction(self._s)
      self._delSdelE = self._delSdelE.T

    self._delWdelE = self._delSdelE * self._x


class hiddenLayer(neuronLayer):
  def backdrop(self,delSdelE,wn):
    if(self._ouput_num==1):
      self._delSdelE = (delSdelE * wn).sum() * self.dActivationFunction(self._s)
      self._delSdelE = self._delSdelE.reshape(self._neuron_num,1)
    else:
      self._delSdelE = (delSdelE * wn).sum(axis=0).reshape(1,self._neuron_num)
      self._delSdelE *= self.dActivationFunction(self._s[0,:])
      self._delSdelE = self._delSdelE.T

    self._delWdelE = self._delSdelE * self._x
実際に分類したりMNISTで手書き文字認識したりは次の記事に書く。
LPC1114FN28でマルチコプター作ってみた-フライトコントローラー-
マルチコプターのフライトコントローラを作ったときのメモ
プロポ入力
S-BUSが使いたかったのでFutaba 10Jを採用
S-BUSはFutabaの規格で仕様は公開されてないが
解析している人がいたのでありがたく使わせてもらった
Futaba S-BUS controlled by mbed | mbed
反転したボーレート100kのUARTなので
74AC04で反転してLPC1114FN28のシリアルポートで受信した
S-BUS2だとテレメトリーの情報をプロポに戻せるので対応したかったが
残念ながら実装するスペースがなかった
情報は↓に載ってた
sbustelemetrysensors.blogspot.jp
6軸センサー
Amazonでも売ってるMPU-6050を採用
I/FもI2Cなのでマイコンとの接続も楽チン
センサー周りはプログラムも含め別途記事にする予定。
回路図
基板を作成するために回路図を作成した。
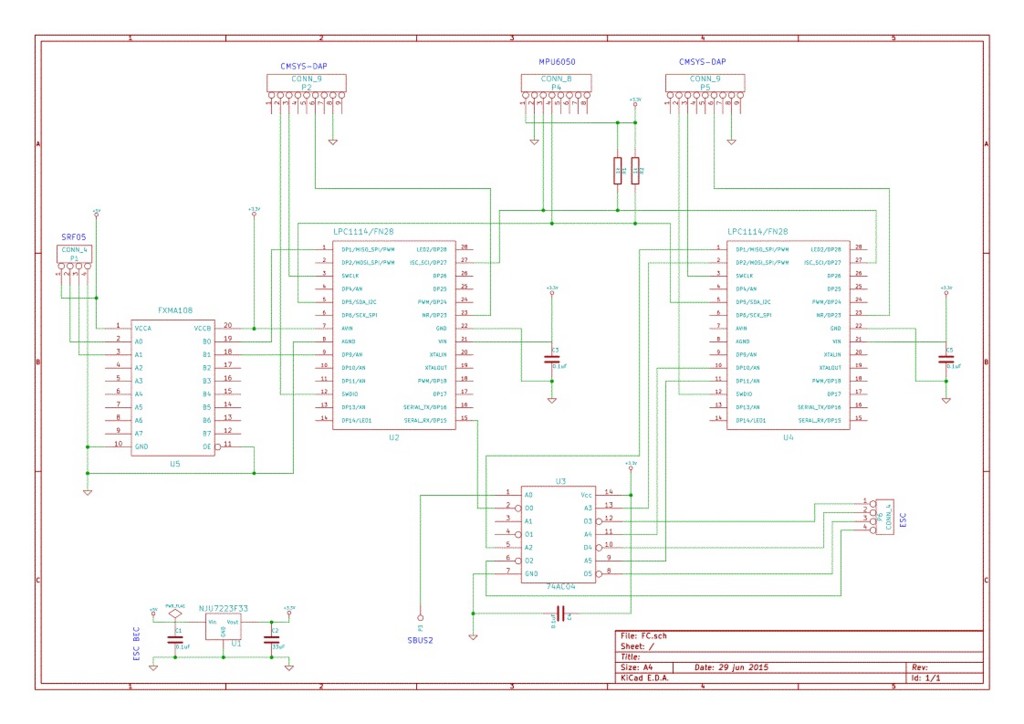
まず、ブレッドボードで様子見して基板を作成したが、
ブレッドボードで飛ばした時に比べ基板を使うとと明らかに挙動が悪くなった。
原因はブレッドボードに比べ、基板はしっかりフレームにねじ止めしたので
モーターの振動が6軸センサーに悪影響を及ぼしたと思う。
センサー値にLPFをかけたりしたが改善しなかった。
なので、最終的にはブレッドボードのままにした。
なお、先日のマルチコプター本体は超音波センサーとFXMA108は
スペースが足りず実装しなかった。
プログラムについてはまた後日記事にする予定。
LPC1114でマルチコプター作ってみた-フレーム-
マルチコプターのフレームを作ったときのメモ
フレーム材料
材料は悩んだが入手性・強度・軽量・加工性を考えてアルミの角材+アルミ板を採用
カーボンは理想的だけと加工は大変だし何より高いので不採用
木材は加工が容易だが強度の見積もり方法が全く分からなかったのでこれも不採用
木材で工作している人は強度をどうやって計算しているのだろう?
強度計算
強度計算は構造計算に使う計算式を使った。
公式集−構造計算 片持ち梁 (曲げモーメント、せん断、反力、たわみ・・)
中心部を支点、プロペラ位置を荷重点と考えて計算
↓がホームセンターで売ってるアルミ材を元に計算した結果

上図から15×15×1.5を採用
なお、重さだかどうするか悩んだ結果以下の見積もりにした
・本体重量は1.5kg(モーター1個当たり375g)
・4Gまで耐える
・安全率は5
なので合計の7.5kgとした。
この見積もりで問題ないかは全く不明・・・
結果論だがマルチコプターが墜落しても壁にぶち当たってもフレームには全く問題が起きなかった。
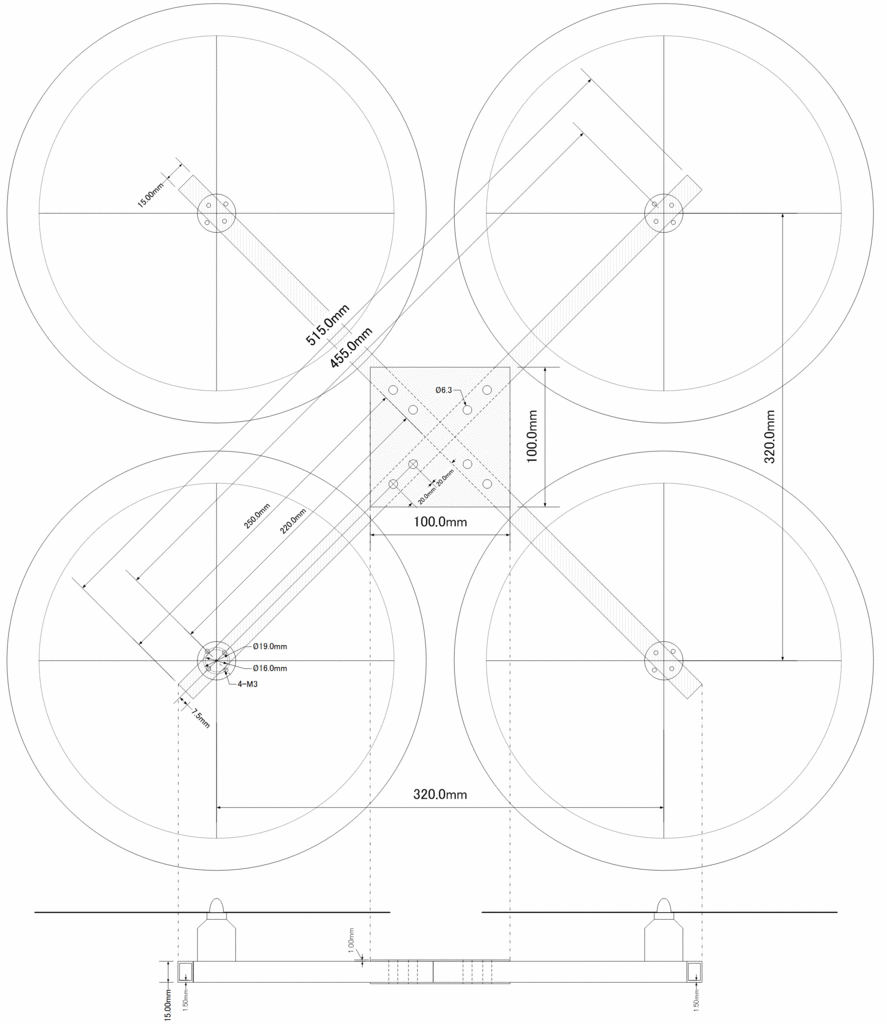
設計図
検討結果から書いた設計図
LPC1114+CMSIS Libraryでprintfを使ってみた
LPC11xx_cmsis2_Libに実装されているUARTSend関数を使ってシリアル出力していたが
文字列以外の表示が面倒なのでprintfを使えるようにした。
今の所2種類の方法で動いたので両方メモしておく。
試した環境
- LPCXpresso_7.7.2_379
- LPCXpresso1114_cmsis2.zipをインポート済み
C:\nxp\LPCXpresso_7.7.2_379\lpcxpresso\Examples\NXP\LPC1000\LPC11xxにある - Redlib(none)
- LPC-Link2(Semihostingを使う際は必要)
Semihostingを使う
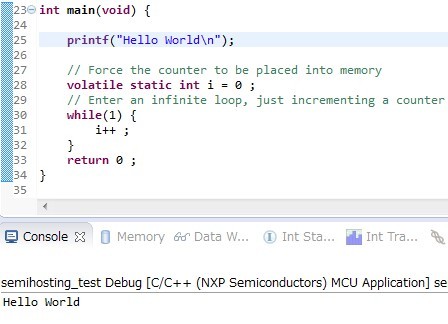
LPC-Link2があるならSemihostingを使うとLPCXpresso上でprintfの結果が見える。
使い方も簡単でNew projectでC Project (Semihosted)を選ぶだけ。
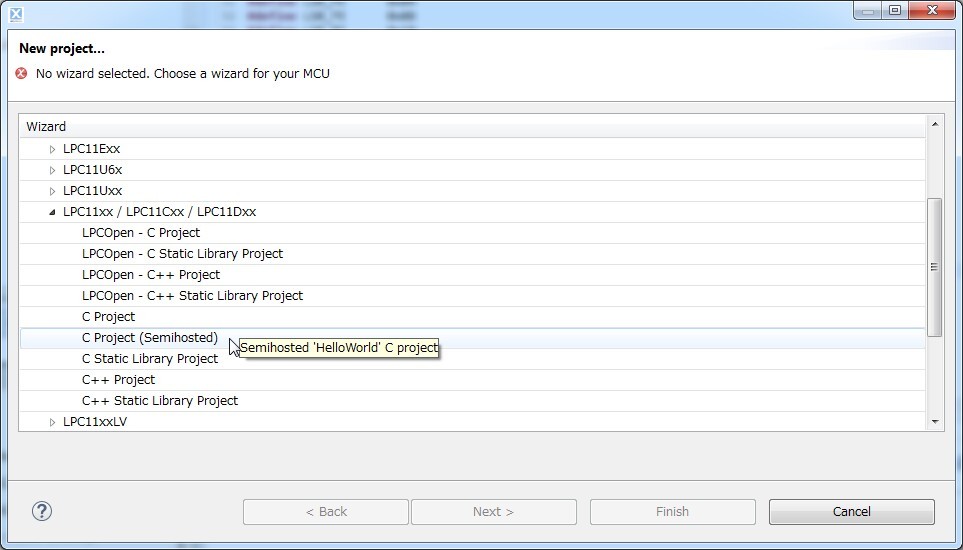
出てきたサンプルコードを実行するとLPCXpresso上のConsoleにHello Worldが表示される。
syscallを実装してUART経由でprintfを使う
New project->C Projectで作成したプロジェクト上でprintfを呼び出すと
Redlib(none)ではSystemcallが実装されていないのでリンク時エラーが発生する。
c:/nxp/lpcxpresso_7.7.2_379/lpcxpresso/tools/bin/../lib/gcc/arm-none-eabi/4.9.3/../../../../arm-none-eabi/lib/armv6-m\libcr_c.a(fpprintf.o): In function `printf':
fpprintf.c:(.text.printf+0x38): undefined reference to `__sys_write'
c:/nxp/lpcxpresso_7.7.2_379/lpcxpresso/tools/bin/../lib/gcc/arm-none-eabi/4.9.3/../../../../arm-none-eabi/lib/armv6-m\libcr_c.a(_deferredlazyseek.o): In function `__flsbuf':
_deferredlazyseek.c:(.text.__flsbuf+0x88): undefined reference to `__sys_istty'
c:/nxp/lpcxpresso_7.7.2_379/lpcxpresso/tools/bin/../lib/gcc/arm-none-eabi/4.9.3/../../../../arm-none-eabi/lib/armv6-m\libcr_c.a(_writebuf.o): In function `_Cwritebuf':
_writebuf.c:(.text._Cwritebuf+0x16): undefined reference to `__sys_flen'
_writebuf.c:(.text._Cwritebuf+0x26): undefined reference to `__sys_seek'
_writebuf.c:(.text._Cwritebuf+0x3a): undefined reference to `__sys_write'
c:/nxp/lpcxpresso_7.7.2_379/lpcxpresso/tools/bin/../lib/gcc/arm-none-eabi/4.9.3/../../../../arm-none-eabi/lib/armv6-m\libcr_c.a(alloc.o): In function `_Csys_alloc':
alloc.c:(.text._Csys_alloc+0xe): undefined reference to `__sys_write'
alloc.c:(.text._Csys_alloc+0x12): undefined reference to `__sys_appexit'
c:/nxp/lpcxpresso_7.7.2_379/lpcxpresso/tools/bin/../lib/gcc/arm-none-eabi/4.9.3/../../../../arm-none-eabi/lib/armv6-m\libcr_c.a(fseek.o): In function `fseek':
fseek.c:(.text.fseek+0x18): undefined reference to `__sys_istty'
fseek.c:(.text.fseek+0x3c): undefined reference to `__sys_flen'
collect2.exe: error: ld returned 1 exit status
Systemcallの定義はlibconfig-arm.hに記述されているので適当に実装してみた。
以下サンプルコード
#ifdef __USE_CMSIS
#include "LPC11xx.h"
#endif

#include <stdlib.h>
#include <stdio.h>
#include <string.h>

#include "uart.h"

#include <cr_section_macros.h>

// TODO: insert other include files here

// TODO: insert other definitions and declarations here
void uart_putc(const char);

////////////////////////// Systemcall //////////////////////////
int __sys_write(int iFileHandle, char *pcBuffer, int iLength)
{
    int n;
    for (n = 0; n < iLength; n++) {
        if (pcBuffer[n] == '\n'){
            uart_putc('\r');
        }
        uart_putc(pcBuffer[n]);
    }
    return iLength;
}
int __sys_istty(int handle)
{
    return 1;
}
int __sys_flen(int handle)
{
    return 0;
}
int __sys_seek(int handle, int pos)
{
    return 0;
}
void __sys_appexit (void)
{

}
////////////////////////// UART ////////////////////////
// send a character via TXD
void uart_putc(const char c) {
    // Wait for TX buffer empty
    while (!(LPC_UART->LSR & LSR_THRE));
    // Put a character
    LPC_UART->THR = c;
}
////////////////////////// Main //////////////////////////
int main(void) {
    UARTInit(115200);
    // Force the counter to be placed into memory
    volatile static int i = 0 ;
    // Enter an infinite loop, just incrementing a counter
    while(1) {
        i++ ;
        if (i % 1000000 == 0){
            printf("i = %d(dec) ",i);
            printf("%08x(hex)\n",i);
        }
    }
    return 0 ;
}
uart_putc関数はエレキジャックのHPにあったコード*1を
そのまま使わせて頂きました。
実行するとUARTからprintfの結果が送られてくる。
i = 1000000(dec) 000f4240(hex)
i = 2000000(dec) 001e8480(hex)
i = 3000000(dec) 002dc6c0(hex)
i = 4000000(dec) 003d0900(hex)
scanf
printfが動作したので、ついでにscanfも実装しようとしたがうまく動かなかった。
__sys_readと__sys_read_cを追加で実装したが
デバック実行でブレイクポイントを設定しても止まらなかった。
Redlib内の動きが分かれば良いのだが
ソースコードは公開されていない為scanfの実装はあきらめる。
